zaterdag 13 juni 2015

Flint stone arrowhead pendant


The design of this pendant is 'loosely based on a Chalcedony arrowhead'. The idea came from a visit to the Geologische Museum Hofland.

The idea was to capture a cabochon cut Onyx in an arrow-shaped sterling silver pendant. The Onyx is flanked by two other members of the Chalcedone family, red Carnelians, as a homage to the Chalcedony arrowhead that provided the inspiration for this pendant.


Here is the initial design. well, not the initial-initial design, because the red Carnelians were added only after my initial-initial design was improved by my dearly beloved, artistic, insightful and ever so clever wife.


Here, the design is getting more '3D'. Not by the use of a fancy 3D printer, but by using simple hand tools to form a piece of aluminium wire to fit the design. I really need this to see if a design works, as my visualization skills lack. You can see I wrote down 'Granaat' instead of 'Carnelian'. I could tell you that 'Granaat' is Dutch for 'Carnelian', but it is not. I simply thought all red stones in our stock were Garnet (Granaat) and did not read the label at the bottom of the container...


Here is the Onyx bezel getting shaped in sterling silver. It is a nice job, I like making bezels for stones.


The bezels for the smaller Carnelians proofed to be a pain in the *ss to make. I Also found out the we should have bought other mandrels for making bezels. The tapered ones instead of the stepped ones, as the stepped ones s*ck.


I managed to fabricate the bezel anyway, although it took way too much time. The result justifies the effort in my opinion. Here is the pendant almost finished. The frame and bezels are not soldered together, and the stones are not set yet.


Then, I got really involved in soldering, quenching, pickling, sanding and soldering, quenching, pickling, sanding, sanding and polishing so I have no more pictures from the intermediate stages. Which is rather convenient, because I managed to disintegrate the smaller one of the Carnelians in the process. Fortunately, we had another one in stock So Fast-Forward to the final result: My arrowhead pendant, perched on another Chalcedony mineral!


This pendant is for sale in our webshop.

dinsdag 2 juni 2015

More Power (and lower oxygen bill)

I Decided that I need more power for soldering, and at the same time reduce my oxygen bill. I Will describe what I did, but bear in mind that working with flammable gases is dangerous, so you must not try to duplicate my build. As I am quite frugal, I am looking at a cost effective solution. So I would like to have a burner that uses the same gas cylinder that my Little Torch uses: 600ml Supergas gaspatroon 7/16" I Use a thread die to create 4 x 0.75mm thread on the brass tubing and make a hose pillar of the opposite side of the tube, that will later connect to the hose. I attach a copper wire around the tube with some silver solder. That ring will hold the hose in place. I solder another such ring around the threaded end of the tube. This ring will compress the rubber O-ring against the burner head, sealing the tube.The tube screws into the burner head with teflon tape and the o-ring to make the connection gas tight.I Use a piece of willow, left over from a hiking stick project, to make a wooden handle and connect the hose to the brass hose pillar using a hose clamp.
The result looks like this. It is now ready to be leak-checked (outside) and tested!
The result looks like this. It is now ready to be leak-checked (outside) and tested!The result looks like this. It is now ready to be leak-checked (outside) and tested!Remember: DO NOT TRY THIS AT HOME!
I Will only use the 5/16" coupling and valve, and discard the rest. The supplied hose is a bit short, so I also order this 180cm braided pneumatic hoseBut enough about the cost. Time to do some building!
The hose comes with two couplings that I cut off. It connects to the 5/16" valve in the same way as the original hose.
Now I make 4mm threat in the burner inlet. I Use a 4 x 0.75mm threat tap to do that, m aking sure no debris enters the burner head as that will render the valve inoperative.


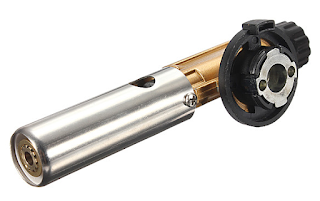
I Found a very cheap burner on Aliexpress that connects directly to a butane cylinder. I Could just buy this one and use it as is, but where is the fun in that? It also would be very bulky and not use the same cylinder as my LT.

But the burner is very usable, made of metal (not brass as you would expect from the picture, but some kind of undetermined alloy), it has an igniter and can be connected to a standard butane gas cylinder without additional pressure regulator.


So to connect it to a 5/16" gas canister, you need valve with the right coupling. Fortunately, Aliexpress sells just what I need. A hose with this coupling, and another coupling to connect it to a 'normal' butane cylinder. This hose is normally used to fill the smaller canisters from a larger one. 


This hose is 4mm internal and 6mm external with a nylon sheath and has a maximum pressure of 5.5 Bar. Butane gas cylinders have a maximum pressure of 4 Bar at 50°C. So the hose is sufficiently strong for the expected maximum gas pressure. It is similar in build as the hoses that connect to the Smith Little Torch and allow plenty of freedom of movement.


I Found a piece of 4mm brass tubing and wood for the handle.

The burner, valve and hose cost me a total of US$ 23 (about €20).

The disposable gas cylinder with 7/16" coupling costs another €5, so that brings the total cost up to €25.


The burner needs some rework in order to connect it to the hose.

I unscrew and discard the metal ring at the bottom. The plastic ring also comes loose. It is no longer needed, but I do retain the rubber O-ring that is seated against the burner inlet.


The burner head turns out to become quite hot during use, but the burner works very well for soldering jewelry.